
Don't get me wrong. I also use a nice camera to take product photos...specifically a Canon EOS Rebel XTi that I got about 7 years ago with a macro lens I've had for a little over a year. Since I got this phone, I find the process of taking photos, uploading to the computer, editing, then posting them online to be TEDIOUS. I've never had a desk job and find that I have a difficult time working on the computer more than 1 hour at any given time.


For example, I like how my headpins look held as a "bouquet" in my hand using my phone and natural light, cropped, with no other editing:
Better than the photo of them in the photo tent using a macro lens:
To try to help you take better camera phone photos, I grabbed a couple pieces out of my jewelry box. I purposely took bad photos, then took better photos to illustrate the difference.
Example #1
The first photo has at least two major problems. While there's natural light, it's direct late afternoon light, which is harsh, casts lots of shadows, and adds a lot of gold to the photo. Since I prefer to do as little editing as possible, the golden glow and shadows are unacceptable. The other big thing that's wrong is that the photo is just plain boring. The shot is too wide.
These photos were all taken on my kitchen tile. So to correct for the shadows and gold color cast by the sun, I moved to an area that wasn't in a patch of sun. That is the ONLY difference I made. These photos are completely unedited. However, it's still boring (and completely uncropped).
This next photo, the key is still in direct sun, but I've angled the phone and come in as far as I could for a more interesting shot. It makes a big difference to the interest level of the key, and the glass looks really sparkly in the sunlight. However, I do NOT like the shadows being cast for a product shot. If it was simply an "artsy" shot to share on Facebook or Instagram, this would be totally acceptable.
The next photo of the key is close-up, slightly angled, and out of direct sun-light. The ONLY editing I did was to crop it into a square-ish shape.
When trying to get up close and personal with your jewelry (or other product), it's best to get the camera as close as possible then crop further if needed. Do not use the zoom feature. Here's an overdramatized example.
Original unedited uncropped photo taken too far away:
What happens when keeping the camera at the same distance but zooming in instead:
What happens when you crop the original photo taken at a super wide angle. The quality isn't perfect (because I cropped this an excessive amount as an example of the difference), but it's a heckuvalot better than the photo above.
Do you know how to crop your photos on your phone?
On my phone, when looking at a photo, it looks like this. Click on the edit button at the bottom.
Then perform the correct function. Crop is that overlapping square symbol on the bottom right. Flipping the photos (which I clearly did) is bottom left.
Example 2:
What's wrong with this photo? Golden sun casting shadows. Some areas look washed out. The angle is too wide.
The color and light is better, but the angle is too wide. And it looks like maybe I didn't focus this one where I wanted the focus to go.
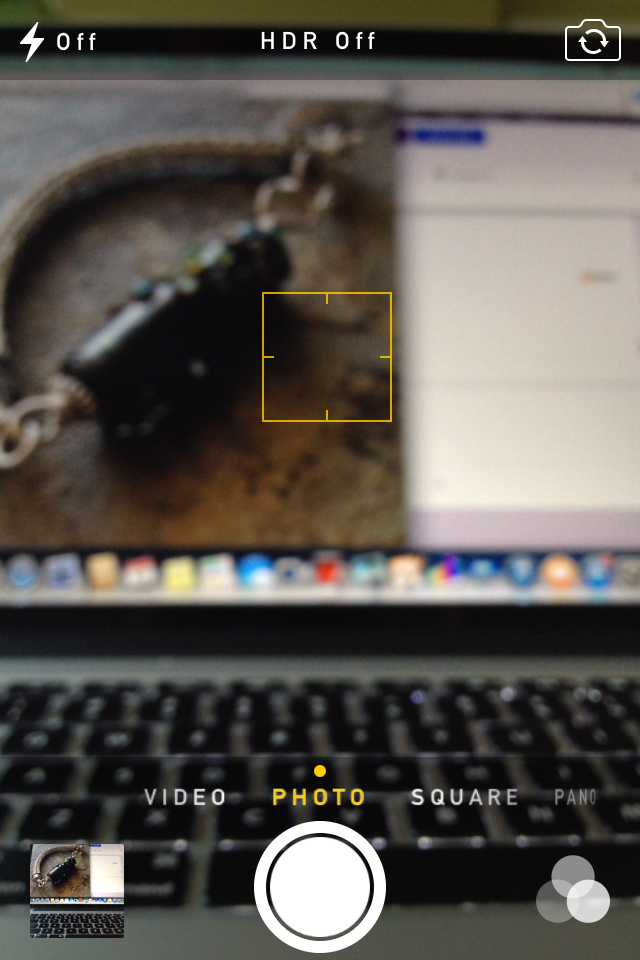
How does one adjust the focus? I can tell you how to do it on my phone, but it's kind of tricky to show it. Use your finger to touch the area of the screen on the object you want to focus on. The other thing this does is automatically adjusts the color/lighting to the object your focusing on to (usually) make it better.
Here's a screen shot of the camera working on focusing right after I've touched a spot on the screen. The yellow square is the area I am having the phone focus on. Once it's focused, the square goes away.
The next photo the bracelet fills the frame and isn't bathed in bright golden light.
And remember that if you do super tight photos, you will want to show multiple views.
And for the final example, I photographed this gorgeous beaded necklace by Kristen Stevens using one of my Nightmare Insomnia beads. Shadows, sun, too far away to see any of the detail that makes this necklace so special.
The next one it has been removed from direct sunlight. The lack of shadows helps show a bit more of the detail, but it's still too far away to really draw the viewer in.
And here is the focal portion with the camera held as close as possible and at a more interesting angle than straight above. You can now see more details in the piece than before.
The above photo was cropped in Instagram. I used zero filters on it. If I'm selling a piece, I prefer to use no filters so the color looks as accurate as it possibly can.
However, sometimes I use filters when I'm just showing a piece. I mostly like how the filters highlight certain areas of the photo and add a small border without any actual work. Below are three different filters of the photo above. Having comparisons like this can show you exactly how the filters change the look of the piece you're photographing. The change can be subtle, or striking.
Mayfair:
Hudson:
Sierra:
In the above photo, we get a good look at the focal. But what about the rest? We (your potential customers) want to see the beading. And the clasp. So change the view, rearrange, move the phone. Here's another view of the same necklace above. The focal is blurred and moving off into the distance. The beading is front and center. Notice the empty space in front? All these aspects of the photo work together to create interest, tension, and to keep the viewer's eyes moving.
And here is the same exact photo, but using the XPro filter on Instagram. It makes the background fade away and adds more emphasis to the beading. I love this look!
Will I ever really throw out my digital SLR camera? Heck NO! But knowing how to take great photos with a smart phone really makes having an online presence easier.
Go forth and take great photos!
-Jen Cameron
Splendid article, Jennifer!
ReplyDeleteWonderful and in-depth post about using phone-cameras. Love your gorgeous bead and Kristen's beautiful necklace.
ReplyDeleteAwesome examples and shots! While my old iPhone 4 (not 4S) took what I thought were awful photos (it was probably me), my HTC Rezound takes amazing shots and I use it all the time, too. I do still prefer my Lumix for my macro shots, but I hear there's a new lens thingy for the iphones that makes macros look amazing. I may have to switch back to an iPhone once this one goes 'kaput', since they no longer make it, and if so, I will definitely try my best to get good photos like you show here. Your info and examples in this post are just super! Thanks.
ReplyDeleteGreat article! When I was first photographing jewelry i made (instead of jewelry I bought for review) I LOVED close ups. But then feedback came criticizing the photos for not showing everything at once. I have worked so hard to figure out good cameras, lighting, etc for the everything photos -- something I find extremely hard to shoot& look good in pics. I'm glad an expert like you suggests several closeups showing overall detail. They are so easy on the eyes & do indeed portray the image with detail! It seems to me overall shots are needed for sales, and then a light-box, gradient background, tripod are all needed. As for zoom, do you mean not to use it on a phone? It works great on my Nikon & Cannon, but the focus is sharp & I can choose where to focus, even in zoom, using my nice cameras.
ReplyDeleteThank you for a great article!
Rita
Good article and it gives me hope.So far, I've been very disappointed in my iphone 5's camera. Everything comes out dark, far away, and no settings! My husband's (dumb) blackberry took fantastic photo's but it's out of date now. I haven't tried to photograph my enameling but after rereading this post, I will! I must be missing something.
ReplyDeleteGreat article, I'm finding I don't like my camera pictures after using my iPhone, and I love instagram!
ReplyDeleteI take all my photos using my iPhone (now a 5s but previously I had a 4s), it works beautifully! I would highly recommend you download the Camera+ app, it lets you manipulate the image a lot more than the standard iPhone camera app. Thanks for the great article, I am always learning more about photography!
ReplyDeleteGreat tips and explained so well! Thanks
ReplyDeleteThank you so much for the tips! I am finding that I am using my iPhone more and more for my pics. It is just too big of a hassle to dig out my nice camera when my phone does such a nice job.
ReplyDeleteI've also started using just my iPhone for product photography in my Etsy shop. It is so much more streamlined and saves me hours of time. Great article!
ReplyDeleteOh Jen!!!!!!! I have bee. Loving my phone pics too but I wasnt sure if it was just me. Thank you for also using my necklace to sho me.
ReplyDeleteI am happy I came upon this tutorial, you answered all of the questions I had, on how to use the iphone, for taking pictures. Thank Much! :-)
ReplyDeleteJen: thanks for these helpful tips. I'm going to try and then try again.
ReplyDeleteGreat article. You are very clear in your explanations. I tend to depend on my phone also for photos. Setting up the booth is too much work sometimes.
ReplyDelete